Where on earth did the time go? I swear it was like January just yesterday, though despite the warmer weather and the flux of warm to cold since January, I'm glad the sun is shinning more.
What's been happening? A LOT of cooking! I'll get caught up soon I swear!
I got a new position in the company back in December and have been busy every since!
So what's been new on the table? Are you ready for this list???
Pineapple Salsa
Tomatillo Salsa
Blackbean Chicken and Tomatillo Enchiladas
Ramen Noodle Salad - a request from a friend today for the recipie and its not on here and I'm shocked!
Rotisserie Chicken, Mushroom Pasta Bake
Red Enchilada Sauce
Meatball Subs and Roasted Zucchini
Aromatic Tomatoes and Rice
Sweet and Sour Chicken
I'm sure there were so many others, these are all the great ones I can't wait to share!!!
Are you ready to get out your cutting boards and start with new and easy meals?
Let's GO! Soon so soon I'll start posting after this holiday weekend! Have fun, get outside and welcome the summer and the sun back into our lives!
Thursday, May 23, 2013

Tuesday, January 29, 2013
Sauteed Brussel Sprouts
Brussel Sprouts go so unloved as a vegetable. You either love them or you hate them... I've found few people that would choose brussel sprouts over any other veggie... I'm not sure where my parents went "right" with me, seeing that I don't think my sister would ever consider trying them .... EVER.
Top 5 favorite veggies - 1. Brussel sprouts, 2. Peas, 3. Cauliflower, 4. Broccoli, 5. Asparagus ...
Seeing that Onions, Sweet Potatoes and Beets are not really veggies but more of roots.... they are up there in a favorite too. Other favorite foods most people would think I'm weird... so maybe some other time we will talk about my favorite foods that most people hate...
But I digress.... Did you know if you google "most hated foods" or "most hated veggies" ... Brussel Sprouts come up as number 1 on both lists. So let me suggest to you, give it a shot and try something new.
Safeway in Sidney started carrying fresh brussel spouts or maybe I just noticed they had them but either way, it makes me think of home... aka the West Side Market in Cleveland, Ohio where one Brussel spout is probably the size about 4 of these small ones at Safeway, but still they have them and it makes me so excited! So I'm going to share with a new favorite way to enjoy these... Sauteed Brussel Sprouts.
 Sauteed Brussel Sprouts
Ingredients:
1 medium sweet onion
2 lbs fresh brussel sprouts
3 Tbsp Butter
1 Tbsp Sherry Wine Vinegar
Salt and Pepper
Directions:
1. Slice onion (into wedges) and cut brussel sprouts in half (and trim off ends and take off outer leaf if necessary)
2. Saute onion over med-high until half carmelized in 2 Tbsp of butter. Salt and Pepper to taste.
3. When Onions are half carmelized toss in brussel sprouts. Add 1 Tbsp of butter and salt and pepper if necessary.
4. Cook until onions are nearly carmelized and brussel sprouts are getting a brown on them. Toss in the Sherry Wine Vinegar and cook until brussel sprouts are tender.
That's it. Short sweet and easy!
Top 5 favorite veggies - 1. Brussel sprouts, 2. Peas, 3. Cauliflower, 4. Broccoli, 5. Asparagus ...
Seeing that Onions, Sweet Potatoes and Beets are not really veggies but more of roots.... they are up there in a favorite too. Other favorite foods most people would think I'm weird... so maybe some other time we will talk about my favorite foods that most people hate...
But I digress.... Did you know if you google "most hated foods" or "most hated veggies" ... Brussel Sprouts come up as number 1 on both lists. So let me suggest to you, give it a shot and try something new.
Safeway in Sidney started carrying fresh brussel spouts or maybe I just noticed they had them but either way, it makes me think of home... aka the West Side Market in Cleveland, Ohio where one Brussel spout is probably the size about 4 of these small ones at Safeway, but still they have them and it makes me so excited! So I'm going to share with a new favorite way to enjoy these... Sauteed Brussel Sprouts.

Ingredients:
1 medium sweet onion
2 lbs fresh brussel sprouts
3 Tbsp Butter
1 Tbsp Sherry Wine Vinegar
Salt and Pepper
Directions:
1. Slice onion (into wedges) and cut brussel sprouts in half (and trim off ends and take off outer leaf if necessary)
2. Saute onion over med-high until half carmelized in 2 Tbsp of butter. Salt and Pepper to taste.
3. When Onions are half carmelized toss in brussel sprouts. Add 1 Tbsp of butter and salt and pepper if necessary.
4. Cook until onions are nearly carmelized and brussel sprouts are getting a brown on them. Toss in the Sherry Wine Vinegar and cook until brussel sprouts are tender.
That's it. Short sweet and easy!
Thursday, January 24, 2013
Fried Rice
I made some rice for something else and had a bunch left over which inspired me to try and make some fried rice, which is something I've wanted to try for quite some time.
I thought it was going to be so much harder, but really it was SO easy! So if you're a fan this might be for you! I did not make it with any meat in it because I made the BBQ Short Ribs to go with it and forgot to pull some aside for the rice. Anyway, still good, so here we go!

Fried Rice!
Ingredients:
4 Tbsp Vegetable Oil (you use 1 and 2 here and there)
1 medium onion diced
1-1/2 c frozen vegetables (carrots, peas and corn)
2 cloves minced garlic
1 tsp ground ginger
4 eggs (beaten)
4 c cooked (cold) rice (I used Brown rice)
Salt and Pepper - for taste
 1. In a large skillet or wok, over med-high heat, heat up the pan and then 1 Tbsp vegetable oil.
2. Cook onions in wok in vegetable oil and cook til translucent and fragrant.

3. Add frozen vegetables, garlic and ginger. Cook until defrosted, but tender and warm. Salt and Pepper to taste.
4. Remove the vegetable mixture from the pan and set aside in a seperate bowl.
 5. Add 1 Tbsp vegetable oil to pan, then fry the eggs in the same pan. Salt and pepper to taste. When cooked and broken up, add to the bowl of vegetables.
 6. Add 2 Tbsp vegetable oil to pan, and add the 4 cups of cold rice to pan. Get rice how and started to brown and hot. I change it to High to heat the rice.
7. Add back the vegetables to incorporate all together, remove from heat and serve hot.
I thought it was going to be so much harder, but really it was SO easy! So if you're a fan this might be for you! I did not make it with any meat in it because I made the BBQ Short Ribs to go with it and forgot to pull some aside for the rice. Anyway, still good, so here we go!

Fried Rice!
Ingredients:
4 Tbsp Vegetable Oil (you use 1 and 2 here and there)
1 medium onion diced
1-1/2 c frozen vegetables (carrots, peas and corn)
2 cloves minced garlic
1 tsp ground ginger
4 eggs (beaten)
4 c cooked (cold) rice (I used Brown rice)
Salt and Pepper - for taste

2. Cook onions in wok in vegetable oil and cook til translucent and fragrant.

3. Add frozen vegetables, garlic and ginger. Cook until defrosted, but tender and warm. Salt and Pepper to taste.
4. Remove the vegetable mixture from the pan and set aside in a seperate bowl.


7. Add back the vegetables to incorporate all together, remove from heat and serve hot.
Tuesday, January 22, 2013
BBQ Short Ribs in the Crockpot
I'm always looking for something different and being that I made these on New Years, most people go for Pork Tenderloin and Sauerkraut, I went for BBQ Short Ribs and Fried Rice (this will be in the next post). I wanted something I could "set and forget" and this was great!
BBQ Short Ribs in the Crockpot

Ingredients:
3 lbs of Pork Country Short Ribs (I'm sure Beef would be good as well)
1 medium onion
1/2 c ketchup
1/2 c water
1/2 c red wine vinegar
1 Tbsp paprika
1 tsp Chili powder
1/2 tsp dry mustard
1/2 tsp garlic powder
1 tsp worcestershire sauce
1-1/2 tsp kosher salt

1. Quarter the onion and put it in the bottom of the crockpot.
2. Put the short ribs on top of the onions. The reason for the onion is flavor, and to keep the meat off the bottom while it cooks. It's a dual purpose. (I also spray the crockpot with vegetable oil to things don't stick at all before putting anything it the crockpot.)
 3. In a seperate bowl mix all the other ingredients above and pour over the short ribs.
4. Set for either 6 hours on High or 10 hours on Low, depending on what time frame you are looking to have it ready).
**Optional**
There is one more part if you want to have a thicker sauce for the ribs to put on it after, you can take the sauce remove it from the crockpot into a sauce pan, and simmer for 5 mins. Combine 1/4 cup or water with 1 Tbsp of Cornstarch in a seprate bowl and mix until smooth. Add to sauce pan, mix and let cook for about 1 min until thickened. Sever over ribs.
These are so simple and easy. I removed the bones from the short ribs to make it easier to eat after. You don't even need a knife to cut these, they just fall apart.
As always, I would love to hear what you guys think and what you're cooking!
Thursday I'll be posting the Fried Rice that I made for the first time to ever to go along with this.
BBQ Short Ribs in the Crockpot

Ingredients:
3 lbs of Pork Country Short Ribs (I'm sure Beef would be good as well)
1 medium onion
1/2 c ketchup
1/2 c water
1/2 c red wine vinegar
1 Tbsp paprika
1 tsp Chili powder
1/2 tsp dry mustard
1/2 tsp garlic powder
1 tsp worcestershire sauce
1-1/2 tsp kosher salt

1. Quarter the onion and put it in the bottom of the crockpot.
2. Put the short ribs on top of the onions. The reason for the onion is flavor, and to keep the meat off the bottom while it cooks. It's a dual purpose. (I also spray the crockpot with vegetable oil to things don't stick at all before putting anything it the crockpot.)

4. Set for either 6 hours on High or 10 hours on Low, depending on what time frame you are looking to have it ready).
**Optional**
There is one more part if you want to have a thicker sauce for the ribs to put on it after, you can take the sauce remove it from the crockpot into a sauce pan, and simmer for 5 mins. Combine 1/4 cup or water with 1 Tbsp of Cornstarch in a seprate bowl and mix until smooth. Add to sauce pan, mix and let cook for about 1 min until thickened. Sever over ribs.
These are so simple and easy. I removed the bones from the short ribs to make it easier to eat after. You don't even need a knife to cut these, they just fall apart.
As always, I would love to hear what you guys think and what you're cooking!
Thursday I'll be posting the Fried Rice that I made for the first time to ever to go along with this.
Thursday, January 17, 2013
Sweet Potato Chips / Dehydrated Sweet Potatoes
So as some people know my dog Khione has an allergy to wheat, and its hard to find goodies for her to have. She on the other hand, loves sweet potatoes, so I decided to try something new. These are not just for dogs, but for people too! Basically its Sweet Potato Chips.
So the first things you need to do is get a bunch of sweet potatoes. Wash them as you would any potato before cooking it. You can choose to peal them if you prefer that, but I did not.
Slice the sweet potatoes the same width. So all are the same thickness so they cook evenly. I used a mandolin (you can use a knife or slicer or what ever is easier for you, or what you have available).
 You will need to steam or blanch the sweet potatoes. I choose to steam them. If you steam them you only need to steam them for about 4-6 mins, and probably blanch them about the same time.
You will let them cool and preheat your oven to 175*F. I just used cookie sheets, but lined them not over lapping on the cookie sheet, and got 3 sheets at a time to fit in my oven.
Bake them for about 3 hours at 175*F. You will want to check them to make sure they get to how done you would like them. I went for crispy.
They are really good! I did not season them at all because of Khione eating them as well.
I hope you get a chance to try these if you're adventurous or a fan of sweet potatoes.

So the first things you need to do is get a bunch of sweet potatoes. Wash them as you would any potato before cooking it. You can choose to peal them if you prefer that, but I did not.
Slice the sweet potatoes the same width. So all are the same thickness so they cook evenly. I used a mandolin (you can use a knife or slicer or what ever is easier for you, or what you have available).

You will let them cool and preheat your oven to 175*F. I just used cookie sheets, but lined them not over lapping on the cookie sheet, and got 3 sheets at a time to fit in my oven.
Bake them for about 3 hours at 175*F. You will want to check them to make sure they get to how done you would like them. I went for crispy.
They are really good! I did not season them at all because of Khione eating them as well.
I hope you get a chance to try these if you're adventurous or a fan of sweet potatoes.

Tuesday, January 15, 2013
Stuffed French Toast Bacon Cupcakes
Since we talked about baking bacon last week, I figured this was the time to finally share my Stuffed French Toast Bacon Cupcake with Whipcream Frosting.
I saw this on pintrest (and tweeked it a bit as usual) and just needed to find a reason to make it. A co-worker of mine left for a new department and when someone leaves we had a foodfest. Well with his love of Bacon, it became "Bacon Fest 2012"... so I submit to you a crazy insane idea, that when I changed department they found out about it and I made if for a department event.
Here goes nothing...
Stuffed French Toast Bacon Cupcakes with Whip Cream Frosting
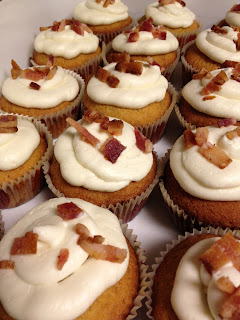
Ingredients:
1 c butter (2 sticks)
1/2 c bacon grease (replace with butter if this scares you)
2 c sugar
3 c flour
3 tsp baking powder
1/2 tsp salt
1 c milk (at room temp)
3 tsp vanilla extract
2 tsp nutmeg
2 tsp cinnamon
2 Tbsp maple syurp (I use butter flavored)
6 large eggs (separated)
1 c Bacon (chopped into pieces)* you can put as much as you want of the bacon in the cupcake, I make a whole package and use about a 1/3 of a cup to top the cupcakes.
Directions:
1. Cook bacon and save bacon grease. If you don't have a full half cup just sub butter for the difference, or if you want to use less same deal, sub butter. Simple way to make it is to bake it, which I blogged about last week. You can learn to bake bacon right here!
2. In a large bowl, mix flour, baking powder, salt, nutmeg and cinnamon.
3. In a small bowl, mix milk and vanilla.
4. In a stand mixer (or bowl to use a hand mixer with) cream butter, bacon grease and sugar on low until fully incorporated.
5. Add egg yolks to butter mixture one at a time. Save the egg whites for a later step.
6. Add flour and milk mixtures until incorporated. Add bacon to mixture.
7. In a separate bowl, whip egg whites on high until peaks are formed. Fold into mixture.
8. Fill baking cups about 1/2 full.
9. Bake at 375*F for about 20 mins.
"Stuffed" Filling:
1 cup cream cheese, softened and cut into small cubes
1 tbsp. milk
1 1/3 cups confectioners/powdered sugar
Directions
Using a hand mixer, stand mixer or a whisk, beat cream cheese and milk until smooth. Gradually beat in the sugar, about 1/4 cup at a time, until the desired thickness is reached.
I pipe this into the middle of the cupcakes after they have cooled to give it a feel of "stuffed french toast." If you don't have a piping back you can take a gallon plastic bag. Make sure its a good quality one or you may end up with random holes as you're piping. You can take a knife and punch a small whole in the top to make it easier without a frosting tip. You're only going to put in about a teaspoon or so into the cupcake, its just enough to give dimension to the cupcake.
Whip Cream Frosting:
16 oz cream cheese
1-1/2 c powdered sugar
1 tsp vanilla
1 c heavy whipping cream, cold
1. In large bowl beat cream cheese, powder sugar and vanilla.
2. In a separate bowl beat heavy whipping cream until stiff peaks.
3. Add whip cream to mixture and quickly combine, beat briefly.
4. Pipe on the top of the cupcake
I saw this on pintrest (and tweeked it a bit as usual) and just needed to find a reason to make it. A co-worker of mine left for a new department and when someone leaves we had a foodfest. Well with his love of Bacon, it became "Bacon Fest 2012"... so I submit to you a crazy insane idea, that when I changed department they found out about it and I made if for a department event.
Here goes nothing...
Stuffed French Toast Bacon Cupcakes with Whip Cream Frosting

Ingredients:
1 c butter (2 sticks)
1/2 c bacon grease (replace with butter if this scares you)
2 c sugar
3 c flour
3 tsp baking powder
1/2 tsp salt
1 c milk (at room temp)
3 tsp vanilla extract
2 tsp nutmeg
2 tsp cinnamon
2 Tbsp maple syurp (I use butter flavored)
6 large eggs (separated)
1 c Bacon (chopped into pieces)* you can put as much as you want of the bacon in the cupcake, I make a whole package and use about a 1/3 of a cup to top the cupcakes.
Directions:
1. Cook bacon and save bacon grease. If you don't have a full half cup just sub butter for the difference, or if you want to use less same deal, sub butter. Simple way to make it is to bake it, which I blogged about last week. You can learn to bake bacon right here!
2. In a large bowl, mix flour, baking powder, salt, nutmeg and cinnamon.
3. In a small bowl, mix milk and vanilla.
4. In a stand mixer (or bowl to use a hand mixer with) cream butter, bacon grease and sugar on low until fully incorporated.
5. Add egg yolks to butter mixture one at a time. Save the egg whites for a later step.
6. Add flour and milk mixtures until incorporated. Add bacon to mixture.
7. In a separate bowl, whip egg whites on high until peaks are formed. Fold into mixture.
8. Fill baking cups about 1/2 full.
9. Bake at 375*F for about 20 mins.
"Stuffed" Filling:
1 cup cream cheese, softened and cut into small cubes
1 tbsp. milk
1 1/3 cups confectioners/powdered sugar
Directions
Using a hand mixer, stand mixer or a whisk, beat cream cheese and milk until smooth. Gradually beat in the sugar, about 1/4 cup at a time, until the desired thickness is reached.
I pipe this into the middle of the cupcakes after they have cooled to give it a feel of "stuffed french toast." If you don't have a piping back you can take a gallon plastic bag. Make sure its a good quality one or you may end up with random holes as you're piping. You can take a knife and punch a small whole in the top to make it easier without a frosting tip. You're only going to put in about a teaspoon or so into the cupcake, its just enough to give dimension to the cupcake.
Whip Cream Frosting:
16 oz cream cheese
1-1/2 c powdered sugar
1 tsp vanilla
1 c heavy whipping cream, cold
1. In large bowl beat cream cheese, powder sugar and vanilla.
2. In a separate bowl beat heavy whipping cream until stiff peaks.
3. Add whip cream to mixture and quickly combine, beat briefly.
4. Pipe on the top of the cupcake
Thursday, January 10, 2013
Baking .... Bacon?
It's true! You can bake bacon...and it makes it amazing without all the hassle!
So I was introduced to baking bacon about 2 years ago and I havn't turned back. I didn't like to make bacon because no matter what I'd get splattered or burned the bacon... This way you don't have all that mess!
Just a couple of easy steps.

1. Line a baking sheet with foil
2. Preheat oven to 350*F
3. Place bacon on cookie sheet
4. Bake for about 25 mins, this depends on how thick the bacon is.
After its done baking, I usually put the bacon on a paper towel to cool. If you're someone that uses the bacon grease its easy to drain than trying to get it out of a round pan and its not burnt (if you're like me and tend to burn it on the stove.
That's it.
And because I started baking bacon, I started making it more. Simple easy, and I love I don't have to stand over it at the stove. Simple, fool proof and so worth it!
Hope it just gives one more dimension to bacon for you.
So I was introduced to baking bacon about 2 years ago and I havn't turned back. I didn't like to make bacon because no matter what I'd get splattered or burned the bacon... This way you don't have all that mess!
Just a couple of easy steps.

1. Line a baking sheet with foil
2. Preheat oven to 350*F
3. Place bacon on cookie sheet
4. Bake for about 25 mins, this depends on how thick the bacon is.
After its done baking, I usually put the bacon on a paper towel to cool. If you're someone that uses the bacon grease its easy to drain than trying to get it out of a round pan and its not burnt (if you're like me and tend to burn it on the stove.
That's it.
And because I started baking bacon, I started making it more. Simple easy, and I love I don't have to stand over it at the stove. Simple, fool proof and so worth it!
Hope it just gives one more dimension to bacon for you.
Tuesday, January 8, 2013
Spinach Stuffed Shells

I LOVE Pasta! Not that I eat it much anymore, but its a treat to make it every now and then. If I had to choose a kind... anything stuffed with cheese! Ravioli, tortellini, manicotti, stuffed shells.... oh they are a favorite!
I swear this is easy! The first time I made it, I thought it was going to be hard, but it's not! I swear!
There are 3 parts to this recipe. The noodles, the filling and the sauce. Of course you can do a jar of sauce or your own deal, It depends on my mood as to if I'm making a quick one or just using a pre-made jar, but below I'll give you a quick and easy recipe for a sauce, but it varies every time. Its all a matter of tasting it as you go.
Part 1 - The Noodles
1 box jumbo shell macaroni noodles.
So the deal is no to over cook these. To cook them with a little crunch still. Then to drain them and let them cool some before filling.
Part 2 - The Filling
Ingredients:
10 oz frozen chopped spinach, thawed and drained.
1 c ricotta cheese
8 oz Feta Cheese crumbled. (will need some for the top)
1/4 tsp garlic powder
Combine all the ingredients above, and fill each shell with about 2 tablespoons of filling. Place in a shallow baking dish and cover with marinara sauce (about 1-1/2 c).
Part 3 - The Sauce - if you choose to make your own.
Ingredients:
15 oz can of Tomato sauce
2 - 6 oz cans of Tomato paste
2-3 Tbsp of sugar
2 Tbsp Italian Seasoning
1 tsp granulated garlic (or garlic powder)
salt and pepper to taste if you feel its necessary, I usually don't use it.
This is the sauce I like to make, it always varies depending on the taste I'm feeling that day. The sugar you will want to cut the acidity of the tomatoes. Its trial and error, but don't go over board until you put a little bit in at a time.
The Final touch
Pour sauce over the noodles, and top with Feta Cheese (or Parmesan cheese).
So after you've assembled everything, it's time to bake!
350*F for about 20 mins.
Thursday, January 3, 2013
Pretzel Marshmallow Treats
Something different and easy. If you like rice krispy treats, well its basically that, replacing the rice krispy cereal with crushed pretzel rods. It gives the salty sweet treat compared to a complete sweet rice krispy treat, though I do enjoy those. It gives a different dimension to a treat.

Pretzel Marshmallow Treats
Ingredients:
3 Tbsp Butter
1 - 10 oz package of large marshmallows or 4 cups of small marshmallows
1 - 10 oz bag of of pretzel rods - crushed
Directions:
1. In a large sauce pan over low heat melt butter and add marshmallows. Stir until completely melted.
2. Mix in pretzel rods (crushed) until completely mixed.
3. Spread the mixture onto a cookie sheet with wax paper. Recommendation of using a spatula that you spray cooking spray on it so it doesn't stick so much.
4. Cut into pieces. Serve with cooled.

Pretzel Marshmallow Treats
Ingredients:
3 Tbsp Butter
1 - 10 oz package of large marshmallows or 4 cups of small marshmallows
1 - 10 oz bag of of pretzel rods - crushed
Directions:
1. In a large sauce pan over low heat melt butter and add marshmallows. Stir until completely melted.
2. Mix in pretzel rods (crushed) until completely mixed.
3. Spread the mixture onto a cookie sheet with wax paper. Recommendation of using a spatula that you spray cooking spray on it so it doesn't stick so much.
4. Cut into pieces. Serve with cooled.
Tuesday, January 1, 2013
Honey Wheat Bread
Happy New Years! Welcome to 2013! I hope you have a healthy and blessed 2013!
So I've come to one thing, home made bread is so much better than store bought. A while back I started making bread, usually doing 2 loafs on Sunday to last the next 2 weeks, sometimes it does, other times it doesn't and the next Sunday I have to make another one. I started making Amish White Bread which I blogged about a while back. And as I've said before I use my bread machine to make the dough and for it to rise, and then bake it in the oven in a loaf pan.
If you are a wheat bread fan, you'll probably like this. And if you're not, give it a try. Its been said before that wheat flour is better than bleached (white) flour, so its worth a shot right?
Honey Wheat Bread
 Ingredients*
1-1/2 tsp active dry yeast (or bread machine yeast)
1-1/8 c Warm Water
1/3 tsp salt
2 Tbsp Vegetable Oil
3 Tbsp Honey
3 c Wheat flour
Set on Dough cycle.
Back in loaf pan 350*F for about 35 mins.
*Ingredients are in order of how to put them into a bread machine, at least mine. Check your manual to make sure you're adding them the right way.
So I've come to one thing, home made bread is so much better than store bought. A while back I started making bread, usually doing 2 loafs on Sunday to last the next 2 weeks, sometimes it does, other times it doesn't and the next Sunday I have to make another one. I started making Amish White Bread which I blogged about a while back. And as I've said before I use my bread machine to make the dough and for it to rise, and then bake it in the oven in a loaf pan.
If you are a wheat bread fan, you'll probably like this. And if you're not, give it a try. Its been said before that wheat flour is better than bleached (white) flour, so its worth a shot right?
Honey Wheat Bread
 Ingredients*
1-1/2 tsp active dry yeast (or bread machine yeast)
1-1/8 c Warm Water
1/3 tsp salt
2 Tbsp Vegetable Oil
3 Tbsp Honey
3 c Wheat flour
Set on Dough cycle.
Back in loaf pan 350*F for about 35 mins.
*Ingredients are in order of how to put them into a bread machine, at least mine. Check your manual to make sure you're adding them the right way.
Thursday, December 27, 2012
Almond Chicken
So this is another favorite at home. It's almost like fried chicken but better! I found this a while back looking for something different. I've been meaning to try it with pecans or even pistachios, but I haven't gotten to that just yet. The chicken does not get dried out, which is what I was worried about the first time.

Almond Chicken
Ingredients:
1 c unblanched almonds - ground
1-1/2 tsp Paprika
2 large eggs
4 chicken breasts
4 Tbsp Olive Oil
1 Tbsp Butter melted
Directions:
1. Mix almonds and paprika in a bowl.
2. Salt and pepper chicken. Dip Chicken in eggs (beaten) and then in Almond mixture.
3. Put chicken on a plate or cookie sheet and set in fridge for minimum 1 hour.
4. Heat up oilve oil and butter in frying pan. Toast chicken on both sides until medium brown and creates a crust.
5. If you have a wire rack or something like it. I use a grill flat basket for this. Put it on the cookie sheet to keep the chicken off the bottom of the pan to keep it out of drippings when cooking in the oven.
6. Bake at 350*F for about 30-45 mins, or until chicken is done cooking.

Almond Chicken
Ingredients:
1 c unblanched almonds - ground
1-1/2 tsp Paprika
2 large eggs
4 chicken breasts
4 Tbsp Olive Oil
1 Tbsp Butter melted
Directions:
1. Mix almonds and paprika in a bowl.
2. Salt and pepper chicken. Dip Chicken in eggs (beaten) and then in Almond mixture.
3. Put chicken on a plate or cookie sheet and set in fridge for minimum 1 hour.
4. Heat up oilve oil and butter in frying pan. Toast chicken on both sides until medium brown and creates a crust.
5. If you have a wire rack or something like it. I use a grill flat basket for this. Put it on the cookie sheet to keep the chicken off the bottom of the pan to keep it out of drippings when cooking in the oven.
6. Bake at 350*F for about 30-45 mins, or until chicken is done cooking.
Tuesday, December 25, 2012
Merry Christmas!!
I'd like to wish you all a very Merry Christmas!
 From my family to yours, I hope its filled with friends, family and cheer!
And from my dog Khione (pictured above), I hope it's a relaxing and lazy day!

And from my dog Khione (pictured above), I hope it's a relaxing and lazy day!
Monday, December 24, 2012
Honey Wheat Zucchini Muffins
I have all this zucchini from the summer that I shredded up and froze and have been wondering what to do with it... I found an answer when our Bagel group at work had a bake sale to rise money for a Adopted Family program in town to help with gifts and helping with bill paying. I had made a lot of cookies and sweets but there are people at work that usually like some healthier option so I figured give this a shot and see how it goes and I think it turned out pretty good.
 Ingredients:
1 c Wheat flour
2/3 c Flour (white/bleached)
1/2 c sugar
1 tsp cinnamon
1-1/4 tsp baking powder
1/4 tsp salt
1-1/3 c zucchini (shredded)
1/2 c milk
2 Tbsp Vegetable oil
2 Tbsp Honey
1 large egg
Topper:
1 Tbsp sugar
1/4 tsp cinnamon

1. Mix Flours, sugar, cinnamon, baking powder and salt together.
2. Add in Zucchini, milk, vegetable oil, honey and egg and mix well.
3. Fill Muffin pans about 1/2 full to 3/4 full.
4. Sprinkle Cinnamon/Sugar mixture for topping on top of each.
5. Bake 400*F for about 15 mins
Makes about a dozen muffins.

1 c Wheat flour
2/3 c Flour (white/bleached)
1/2 c sugar
1 tsp cinnamon
1-1/4 tsp baking powder
1/4 tsp salt
1-1/3 c zucchini (shredded)
1/2 c milk
2 Tbsp Vegetable oil
2 Tbsp Honey
1 large egg
Topper:
1 Tbsp sugar
1/4 tsp cinnamon

1. Mix Flours, sugar, cinnamon, baking powder and salt together.
2. Add in Zucchini, milk, vegetable oil, honey and egg and mix well.
3. Fill Muffin pans about 1/2 full to 3/4 full.
4. Sprinkle Cinnamon/Sugar mixture for topping on top of each.
5. Bake 400*F for about 15 mins
Makes about a dozen muffins.
Saturday, December 22, 2012
Double Chocolate Chip Mini Cheesecakes
How can you go wrong with cookies and cheesecake... especially if you combine them?!?! I thank Nestle Toll House for putting this recipe on display when chocolate chips were on sale. Here is another treat for your upcoming holiday gatherings.
First, you'll need to make some cookie dough. You'll end up with some extra cookie dough from this, so you just might have to make some cookies. See the cookie recipe at the end of this blog.
Double Chocolate Chip Mini Cheesecakes
 Ingredients:
1-1/2 c chocolate chip cookie dough
2 - 8 oz packages of cream cheese
3/4 c sugar
2 Tbsp flour
2 large eggs
1 tsp vanilla
3/4 c chocolate chips
1. Line 24 muffin cups with paper liners. Place 1 Tbsp of cookie dough in each.
2. Bake the cookie above at 325*F for about 10 mins (or until cookie has spread to edge of the cup)
3. Beat cream cheese, sugar and flour in large mixer bowl.
4. Add eggs and vanilla, mix well.
5. Stir in 1/2 c of chocolate chips into batter.
6. Fill the rest of the paper liner with cookie in bottom 3/4 of the cup.
7. Bake at 325*F for 13-15 mins
8. Remove from pan and let cool on cooling rack and then refrigerate for at least 1 hour.
9. Melt the 1/4 c remaining chocolate chips in a baggie. Start with 30 seconds then continue 10 sec intervals until melted.
10. Drizzle chocolate over top of mini cheese cakes before serving.
Nestle Toll House Cookie Dough (if you didn't know its on the chocolate chip bag)
2-1/4 c flour
1 tsp baking soda
1 tsp salt
1 c (2 sticks) butter, softened
3/4 c sugar
3/4 c brown sugar
1 tsp vanilla extract
2 large eggs
2 c choclate chips
1. Combine flour, baking soda and salt in a small bowl.
2. Beat butter, sugar, brown sugar and valilla in a large mixer bowl until creamy.
3. Add eggs, one at a time.
4. Gradually beat in flour mixture.
5. Stir in chocolate chips.
If you have to bake extra cookies - 375*F for about 8-10 mins
First, you'll need to make some cookie dough. You'll end up with some extra cookie dough from this, so you just might have to make some cookies. See the cookie recipe at the end of this blog.
Double Chocolate Chip Mini Cheesecakes

1-1/2 c chocolate chip cookie dough
2 - 8 oz packages of cream cheese
3/4 c sugar
2 Tbsp flour
2 large eggs
1 tsp vanilla
3/4 c chocolate chips
1. Line 24 muffin cups with paper liners. Place 1 Tbsp of cookie dough in each.
2. Bake the cookie above at 325*F for about 10 mins (or until cookie has spread to edge of the cup)
3. Beat cream cheese, sugar and flour in large mixer bowl.
4. Add eggs and vanilla, mix well.
5. Stir in 1/2 c of chocolate chips into batter.
6. Fill the rest of the paper liner with cookie in bottom 3/4 of the cup.
7. Bake at 325*F for 13-15 mins
8. Remove from pan and let cool on cooling rack and then refrigerate for at least 1 hour.
9. Melt the 1/4 c remaining chocolate chips in a baggie. Start with 30 seconds then continue 10 sec intervals until melted.
10. Drizzle chocolate over top of mini cheese cakes before serving.
Nestle Toll House Cookie Dough (if you didn't know its on the chocolate chip bag)
2-1/4 c flour
1 tsp baking soda
1 tsp salt
1 c (2 sticks) butter, softened
3/4 c sugar
3/4 c brown sugar
1 tsp vanilla extract
2 large eggs
2 c choclate chips
1. Combine flour, baking soda and salt in a small bowl.
2. Beat butter, sugar, brown sugar and valilla in a large mixer bowl until creamy.
3. Add eggs, one at a time.
4. Gradually beat in flour mixture.
5. Stir in chocolate chips.
If you have to bake extra cookies - 375*F for about 8-10 mins
Thursday, December 20, 2012
Oreo balls... to die for!
With Christmas and Holiday Parties upon us this season, despite no snow in Nebraska and it doesn't feel like Christmas outside, I submit to you this easy quick and special treat!
If I have a choice of cookies to eat Oreos are not my first choice... They just seem too sweet... but my first year here in Nebraska I was introduced to Oreo balls at a jewelry party... I've made them a few time since then and they are always gone before you know it! So easy and NO baking involved!
Oreo Balls

Ingredients:
1 - 15.5 oz package of Oreos
1 - 8 oz package of cream cheese
Colored sugar or white sugar
Directions:
1. Crush Oreos


2. Mix in cream cheese
3. Form into about teaspoon size balls.

4. Roll in colored (or white) sugar

5. Chill and serve! ENOY!
I have done this with and without a food process... if you have a food processor i say use it! If not it will still work and still be good.
If I have a choice of cookies to eat Oreos are not my first choice... They just seem too sweet... but my first year here in Nebraska I was introduced to Oreo balls at a jewelry party... I've made them a few time since then and they are always gone before you know it! So easy and NO baking involved!
Oreo Balls

Ingredients:
1 - 15.5 oz package of Oreos
1 - 8 oz package of cream cheese
Colored sugar or white sugar
Directions:
1. Crush Oreos


2. Mix in cream cheese
3. Form into about teaspoon size balls.

4. Roll in colored (or white) sugar

5. Chill and serve! ENOY!
I have done this with and without a food process... if you have a food processor i say use it! If not it will still work and still be good.
Tuesday, December 18, 2012
Quiche....first time for everything
To continue on with this week of Holiday specials, today the idea was breakfast and I took a shot over this weekend to try out some quiche! Easy and quick, always my favorite type of recipes, along with ones you can customize to your taste. So to celebrate the Christmas season, and those gathering before us, enjoy these ideas for gatherings and even Christmas morning, or any other morning!
I've never made a quiche before, but I knew I had a pie crust still from Thanksgiving. So what sounded good on a chilly Saturday Morning... making a quiche. I've never done it before, so there's a first time for anything.
For the pie crust, go back to my post from a few days ago and follow it through the entire baking.
So I decided to look up what type of recipes I could find. And if anyone knows me, I always tweek it so this is what i came up with and it turned out pretty good!
 Tomato Sausage Quiche
Ingridents:
1/2 lb meat - I used pork sausage and cooked it with garlic, salt and pepper.
1/2 c diced tomatoes - I used cans because I didn't have fresh.
1/4 c onions diced
5 large eggs
1/4 c milk
1/2 c shredded cheese
Baked pie crust
1. Beat eggs and mix in milk, tomatoes, onions, meat and cheese.
2. Pour into pie crust, make sure to get the meat evenly distributed.

3. Bake at 350* F for about 40 - 45 mins.
ENJOY!
Let me know what kind of ingredients you use.
Just make sure you don't over do how much you put in the mix and you drain items as well, so you reduce too much moisture.
I've never made a quiche before, but I knew I had a pie crust still from Thanksgiving. So what sounded good on a chilly Saturday Morning... making a quiche. I've never done it before, so there's a first time for anything.
For the pie crust, go back to my post from a few days ago and follow it through the entire baking.
So I decided to look up what type of recipes I could find. And if anyone knows me, I always tweek it so this is what i came up with and it turned out pretty good!

Ingridents:
1/2 lb meat - I used pork sausage and cooked it with garlic, salt and pepper.
1/2 c diced tomatoes - I used cans because I didn't have fresh.
1/4 c onions diced
5 large eggs
1/4 c milk
1/2 c shredded cheese
Baked pie crust
1. Beat eggs and mix in milk, tomatoes, onions, meat and cheese.
2. Pour into pie crust, make sure to get the meat evenly distributed.

3. Bake at 350* F for about 40 - 45 mins.
ENJOY!

Let me know what kind of ingredients you use.
Just make sure you don't over do how much you put in the mix and you drain items as well, so you reduce too much moisture.
Sunday, December 16, 2012
Easy as Pie... Pie Crust
So for this week, and since I'm back to blogging... I've decided to make a special week of Holiday treats! With the holidays upon us, you probably have a gathering or 2 you'll be attending, why not take something different. Today's pie crust is inspired for Christmas dinner desert!
So it was just before Thanksgiving and it had been a while since making a pie, at least 4 years so I didn't remember what pie crush I used before, so I as in search of a new one. This one I found on Pinterest and it is easy and makes 4 crusts that can be refridgerated and frozen... PERFECT! Especially since I only planed on making 2 pies.
So on to the easy pie crust!

Ingredients:
4 cups Flour
1 Tbsp Sugar
1 Tbsp Salt
1-3/4 c Vegetable shorting (I used butterd crisco sticks)
1 Tbsp vinegar
1 egg
1/2 c water
Directions:
1. Mix flour, sugar and salt in a medium bowl. Cut in shorting with a fork or pastry blender. If you have a food processor you can use it as well by just pulsing it, I did it by hand with a pastry blender.

2. In a separate bowl, mix vinegar, water and egg. Add to flour mixture stiring in with a fork until moistened.

3. Divide into 4 even balls molded by hand.
4. These can now be wrapped in plastic or in a freezer bag.
To continue to the baking when you need a baked crust see below, otherwise use it with recipes that call for refrigerated pie dough.
On to the BAKING!
1. Get the pie pan that you will use out and ready to go.
2. These are perfect for about a 9" to 10" pie pan without being too thin.
3. If you're pulling this out of the fridge let it come near room temp so it doesn't crack entirely when rolling out.
 So roll out the dough with a rolling pin, or if you don't have a rolling pin a glass on its side I've used before.
I found that squishing, yes a technical baking term, with my hands out to about the size I needed then using the rolling pin to get it thinner works best for me.
 Make sure the pan you'll be using fits and have an over hand of about an inch to 1-1/2 inches.
 You'll end up with something like this
Pinch around the top to give it a fancy feel to it.
 If you are baking it first I recommend poking holes with a fork so it does not bubble up on you.
This crust can be baked "filled" with beans or pie weights or "blind" without any weight in it, which is why I was drawn to this recipe.
Bake at 375*F for about 10 mins. It will have a toasted look to it (as least in my oven at about 10 mins...
Now you have an awesome and easy pie crust to try.
So it was just before Thanksgiving and it had been a while since making a pie, at least 4 years so I didn't remember what pie crush I used before, so I as in search of a new one. This one I found on Pinterest and it is easy and makes 4 crusts that can be refridgerated and frozen... PERFECT! Especially since I only planed on making 2 pies.
So on to the easy pie crust!

Ingredients:
4 cups Flour
1 Tbsp Sugar
1 Tbsp Salt
1-3/4 c Vegetable shorting (I used butterd crisco sticks)
1 Tbsp vinegar
1 egg
1/2 c water
Directions:
1. Mix flour, sugar and salt in a medium bowl. Cut in shorting with a fork or pastry blender. If you have a food processor you can use it as well by just pulsing it, I did it by hand with a pastry blender.

2. In a separate bowl, mix vinegar, water and egg. Add to flour mixture stiring in with a fork until moistened.

3. Divide into 4 even balls molded by hand.
4. These can now be wrapped in plastic or in a freezer bag.
To continue to the baking when you need a baked crust see below, otherwise use it with recipes that call for refrigerated pie dough.
On to the BAKING!
1. Get the pie pan that you will use out and ready to go.
2. These are perfect for about a 9" to 10" pie pan without being too thin.
3. If you're pulling this out of the fridge let it come near room temp so it doesn't crack entirely when rolling out.
 So roll out the dough with a rolling pin, or if you don't have a rolling pin a glass on its side I've used before.
 I found that squishing, yes a technical baking term, with my hands out to about the size I needed then using the rolling pin to get it thinner works best for me.


This crust can be baked "filled" with beans or pie weights or "blind" without any weight in it, which is why I was drawn to this recipe.
Bake at 375*F for about 10 mins. It will have a toasted look to it (as least in my oven at about 10 mins...
Now you have an awesome and easy pie crust to try.
Saturday, December 15, 2012
Noodle Kugle
Now many of you are probably wondering "What is noodle kugle"… trust me I didn't make up the name.
So let's turn to google: Kugel (קוגל kugl, pronounced IPA: [ˈkʊɡl̩]) is a baked Ashkenazi Jewish pudding or casserole, similar to a pie, most commonly made from egg noodles (Lokshen kugel) or potatoes, though at times made of zucchini, apples, spinach, broccoli, cranberry, or sweet potato. It is usually served as a side dish on Shabbat and Yom Tov.
Growing up in Orange Schools in the Cleveland area in Ohio, it was a very high populated area by folks that are Jewish. It was a great place to experience so many new meals and traditions in their religion and the culture. I experienced many new dishes and I loved, but above all from a lady named Janet who was the cook for Kiwanis meetings in Pepper Pike…. it took a while and many requests but Janet gave my mom the recipe…. and now I love sharing it with so many people. Some people have a hard time with it being a sweet dish instead of savory, but I think its both. Just be open to something different and so good!
So bringing back the blog again, I give to you my most favorite dish ever….. Noodle Kugle.

Noodle Kugle
8 oz medium width egg noodle
6 Tbsp melted butter
1 pint (16 oz) Cottage Cheese (recommended small/medium curd)
4 eggs beaten
1/2 c apricot nectar
1/2 pint (8 oz) sour cream
Topping
2 c crushed corn flakes
6 Tbsp sugar
6 Tbsp melted butter
1. Boil noodles and drain.
2. Mix in a Large bowl cottage cheese, eggs, apricot nectar and sour cream.
3. When noodles are cooked mix into large bowl with above.
4. Put into a 9x13 casserole dish (or pan).

5. Take about 4 cups of corn flakes out of the box and crush in a plastic bag. Easiest way I've found is with a rolling pin or a glass rolling on its side. This should roughly give you about the 2 cups crushed, give or take a bit.
5. In a separate small bowl mix the topping items. Distribute evenly across the top of the main mixture.

6. Bake at 350*F for 45-60 mins. In my oven roughly 50 mins or so is good. Make sure you look for that the mixture has become solid and not runny and the top is crispy but not burnt.
Best served hot. Reheats well.
So let's turn to google: Kugel (קוגל kugl, pronounced IPA: [ˈkʊɡl̩]) is a baked Ashkenazi Jewish pudding or casserole, similar to a pie, most commonly made from egg noodles (Lokshen kugel) or potatoes, though at times made of zucchini, apples, spinach, broccoli, cranberry, or sweet potato. It is usually served as a side dish on Shabbat and Yom Tov.
Growing up in Orange Schools in the Cleveland area in Ohio, it was a very high populated area by folks that are Jewish. It was a great place to experience so many new meals and traditions in their religion and the culture. I experienced many new dishes and I loved, but above all from a lady named Janet who was the cook for Kiwanis meetings in Pepper Pike…. it took a while and many requests but Janet gave my mom the recipe…. and now I love sharing it with so many people. Some people have a hard time with it being a sweet dish instead of savory, but I think its both. Just be open to something different and so good!
So bringing back the blog again, I give to you my most favorite dish ever….. Noodle Kugle.

Noodle Kugle
8 oz medium width egg noodle
6 Tbsp melted butter
1 pint (16 oz) Cottage Cheese (recommended small/medium curd)
4 eggs beaten
1/2 c apricot nectar
1/2 pint (8 oz) sour cream
Topping
2 c crushed corn flakes
6 Tbsp sugar
6 Tbsp melted butter
1. Boil noodles and drain.
2. Mix in a Large bowl cottage cheese, eggs, apricot nectar and sour cream.
3. When noodles are cooked mix into large bowl with above.
4. Put into a 9x13 casserole dish (or pan).

5. Take about 4 cups of corn flakes out of the box and crush in a plastic bag. Easiest way I've found is with a rolling pin or a glass rolling on its side. This should roughly give you about the 2 cups crushed, give or take a bit.
5. In a separate small bowl mix the topping items. Distribute evenly across the top of the main mixture.

6. Bake at 350*F for 45-60 mins. In my oven roughly 50 mins or so is good. Make sure you look for that the mixture has become solid and not runny and the top is crispy but not burnt.
Best served hot. Reheats well.
Monday, October 29, 2012
Life has been crazy!
Well it has been a while I know. I have been cooking up a storm, but life gets in the way sometimes. We have had friends visit and other friends move to Sidney for work. Life is starting to slow down again and its getting into the holiday season hopefully I can get back on track and start posting again.
Look forward to some Pumpkin Cupcakes, Apple Cream Cheese Treats, Hubbard Squash Soup and so much more!
Look forward to some Pumpkin Cupcakes, Apple Cream Cheese Treats, Hubbard Squash Soup and so much more!
Saturday, September 15, 2012
Amish White Bread
I don't make a lot of bread, but I wanted to start making bread at home more so I started looking at bread machines (just to do the dough part). Someone at work posted they were getting rid of one for $20! Sweet! So I got a hold of them, and better yet they were just ready to part with it (since they had it posted for a while) and I got it for FREE! So worth it!
I finally made so bread this last weekend and it tastes like home! Growing up around Amish Country you get the taste of sweet amazing variety of home made breads, at least in Holmes County and Berlin, Ohio!
I found an "Amish White Bread" recipe and made the dough in my bread machine and its awesome! If you are wanting yo make bread at home, I want to suggest investing in a bread machine even if its only for doing the dough.
 Ingredients:
1 c warm water
1/3 c sugar
3/4 Tbsp Active Dry Yeast (I buy it in a jar, also known as bread machine yeast)
3/4 tsp salt
2 Tbsp Vegetable oil
3 c flour
Directions:
**Make sure you do this all in the right order (for the bread machine).
1. Dissolve sugar and yeast in the water in the bottom of the pan. Let it sit for about 5-10 mins until it bubbles.
2. Add vegetable oil
3. Add flour and salt
4. Set bread machine on dough cycle.
Mine beeps when its done with cycle 1 (knead and rise), I let it go both cycles so it kneaded and raised 2x.
5. You can make it either in 1 loaf pan and it will get really tall, or cut it in half and make 2 like I did.
6. Cut in half (if doing 2) in a greased loaf pan and Shape into loaf(s). Make a slit down the top (to be more professional looking and help it expand). Let rise in pans for a bit before baking.
7. Bake at 350*F for about 30 mins for 1, about 25 mins for 2 smaller ones.
8. Let cool about 5-10 mins before eating and ENJOY!
IF you don't have a Bread Machine:
I finally made so bread this last weekend and it tastes like home! Growing up around Amish Country you get the taste of sweet amazing variety of home made breads, at least in Holmes County and Berlin, Ohio!
I found an "Amish White Bread" recipe and made the dough in my bread machine and its awesome! If you are wanting yo make bread at home, I want to suggest investing in a bread machine even if its only for doing the dough.

1 c warm water
1/3 c sugar
3/4 Tbsp Active Dry Yeast (I buy it in a jar, also known as bread machine yeast)
3/4 tsp salt
2 Tbsp Vegetable oil
3 c flour
Directions:
**Make sure you do this all in the right order (for the bread machine).
1. Dissolve sugar and yeast in the water in the bottom of the pan. Let it sit for about 5-10 mins until it bubbles.
2. Add vegetable oil
3. Add flour and salt
4. Set bread machine on dough cycle.
Mine beeps when its done with cycle 1 (knead and rise), I let it go both cycles so it kneaded and raised 2x.
5. You can make it either in 1 loaf pan and it will get really tall, or cut it in half and make 2 like I did.
6. Cut in half (if doing 2) in a greased loaf pan and Shape into loaf(s). Make a slit down the top (to be more professional looking and help it expand). Let rise in pans for a bit before baking.
7. Bake at 350*F for about 30 mins for 1, about 25 mins for 2 smaller ones.
8. Let cool about 5-10 mins before eating and ENJOY!
IF you don't have a Bread Machine:
- In a large bowl, dissolve the sugar in warm water, and then stir in yeast. Allow to proof until yeast resembles a creamy foam.
- Mix salt and oil into the yeast. Mix in flour one cup at a time. Knead dough on a lightly floured surface until smooth. Place in a well oiled bowl, and turn dough to coat. Cover with a damp cloth. Allow to rise until doubled in bulk, about 1 hour.
- Punch dough down. Knead for a few minutes, and divide in half. Shape into loaves, and place into well oiled 9x5 inch loaf pans. Allow to rise for 30 minutes, or until dough has risen 1 inch above pans.
- Baking is still the same as above.
Subscribe to:
Posts (Atom)